Buscar

Showing posts with label Maya Road. Show all posts

~~ This & that ~~

ania_VSM_card

There’s a lot of exciting things going on both at Maya Road and Glue Arts. First off: Maya Road has teamed up with Vintage Market Street for a productswap…here’s my card created with products from both.. For a chance on the giveaways, check out this, this and this post ;p


Maya Road is also on Pinterest – ofcoure. If you love Maya Road and would like some inspiration – well, seek no longer!

Seen this? Glue Arts have come with a renewed, better Glue Glider handle. Check out this site for more info – looks promising doesn’t? :)

Right.

Be back soon. Or something like that :p

~~ Chalkboard Paint Fun! ~~

You can find this post over at the Maya Road blog aswell! :)


Chalkboard5

Alright, I guess I might be late to the party - I read lots of DIY-projects involving chalkboard paint like, a year ago or more - but only recently actually got to play with it myself. But my oh my - what great fun you can have with just a little chalkboard paint! Truly!

C1444 - Pennant Chipboard Album

For this project, I used the Pennant Chipboard Album.

Chalkboard_txt
Here's the instructions, although it's fairly easy to do so you shouldn't really need instructions =)

1. Find the clean edged chipboard and apply chalkboard paint on it as per its instructions (the paint, that is. I have no idea if all chalkboard paint acts the same :) ). For mine I tested it both with and without gessoing the chipboard. I think I actually prefer to do this without gessoing the chipboard - without it took me two layers of chalkboard paint, with gesso I needed three layers for a proper coverage.

2. Find the scalloped chipboard and either spray or paint it. The front chalkboard was covered in orange acrylic paint, the back chalkboard was covered in Maya Mist (one layer of Bublegum Metallic Mist then topped off with Dragon Fruit Pink Mist). Note: I adhered the chalkboard layer upon the scalloped chipboard, hence didn't need to paint/mist all of the chipboard, only the scalloped part.

3. Find some ribbon (here: Candy Striped Ribbon) or twine to decorate the top of the chalkboard. Optional: I wanted to decorate the twine some by adding small, cute trinkets to it: Wooden Mini Spools and Trinket Beads: Hearts and Butterflies.

Chalkboard2

4: I decided to attach the chalk pen to the chalkboard. This by securing the twine to a wooden button before hot gluing the chalk pen to the button.Tip: Depending on whether your kid is right or left handed - make sure the twine is on the "right" side for your kid.

There you have it - an easy peasy chalkboard project your kid will love! Mine sure did (aged 6 and 10)! And - it really didn't take that long to assemble - like 90% of the effort was spent waiting for paint&mist to dry.

Chalkboard6
Chalkboard
Hope you enjoyed this mini-inspiration project and is now tempted to try it yourself. Remember - just because it says it's a mini album doesn't mean it have to be used for that, you know! :)

Have a lovely week!

-Ania

~~ How come, part 2 ~~

QA_layout_web

Remember my post about Tuva, my niece?

I had to scrap these photos, and did so whipping up the good old Scenic Route papers (loves..but..the paperpack they came in only had one of each pattern..sigh…I prefer paperpacks that have at least two of each patterned paper!)

QA_layout_cu1_web

Minipictures = loves.

Used lots of various chipboards from Maya Road, along with the lovely dragonfruit pink mist…one of my fave colors of the Maya Mists, methinks..

QA_layout_cu2_web

And I totally adore the clearstamps with lots of vintage cameras (say cheese).

QA_layout_cu3_web

I’m not sure on the chandelier-bling here….I really, really wanted to use it, it’s oh so pretty… but hm, maybe I should just have saved it for another page or project, it didn’t really fit in here now did it? Ahwell…it’s glued to the chipboard, so I can’t really remove it now, bleh.

Nevertheless, for more info on this layout and the process, check out my Maya Road-post here. :)

~~ Sibling love–a mini album ~~

mini1

When it takes too long between when I create something and when I’m able/allowed to share, I tend to forget about it..cough… this mini is one of them..I made it a good while ago, as part of my submission for the Maya Road DT-tryout.

It’s made with Maya Road mini+trinkets+stuff (ofcourse), and dressed up in Pink Paislee & lots of crackle paint/glossy accent/whitewashed w/gesso.

mini_NEW1

The crackle paint turned pretty frosty here (I used clear Distress Crackle Paint for the “love” part and Crackle Accent for the letters “sibling”). As for adhesives I used both Glue Arts (Raisen’s one of my faves, it’s used on the robo here…) and Helmars where liquid adhesive was required.

mini4

The bare page looks a bit boring without the “LOVE” in front, does it not? I like how the pages together says “sibling love forever” sorta. =)

mini6mini7

The insidepages are quite simple – one whitewashed page covered with one of the many various Kraft-journaling sheets and decorated w/various embellishments, and one page dedicated to B&W photos.

mini8

I know I gush a lot about the relationship between my kids. It’s just…so unlike mine and my sisters when we were little (I should do a page or two about that I guess – we were pretty good at actual fighting :p Glad our relationship’s better now, as adults, or else it’d be pretty tiresome ;)).

mini11

mini_NEW2

mini12mini15mini16


mini17

I really like to mix just a little paint or gesso to the Kraft tags randomly like on this one..I think it looks pretty cool =)

mini19mini20mini22mini23

Mmm..that’s pretty much it.

It’s pretty straightforward – just ask if you have any questions :)

~~ My Maya Road CHA samples ~~

Oy! Just wanted to share my Maya Road CHA samples now that I got the greenlight to share them! Hooray! =)

ania_accordion8_web_thumb

First, there’s this accordion-mini which’s my favorite methinks, had great fun pondering and figuring out what to do and what to add to this one. And uhm, lemme tell you – it might look quick and easy and it sort of is, but all the filing and waiting for drying and small details and stuff made this take quite a while to complete still! There’s lots of photos for this one, so I figure I’ll just link the 2peas-gallery post and additionally, embed the galleryslideshowthingie here for the complete images..

The thought behind this? Well, A is for Arrows, B is for Bird, C is for Cup of Tea, D is for Dame, E is for Edible (the pumpkin :p) and F is for flower….I used mostly Pink Paislee, lots of the new stuff from Maya Road and quite a bit of paint, glitter, crackle glossy stuff and hm yeah…that’s it I think.


ania_wellies1_web

And then we have this, the wellies boots mini album, dressed up in Crate Paper and lots of Maya Road bits and pieces. 2peas-link here.


ania_wallet1_web

This canvas wallet is pretty awesome, but I had no good ideas as to what I’d do with mine I’ll admit. But – just look at Rondas – I’ll try that next time! :)

ania_wallet2_web

Lovelove the bejewelled button here…! And the houndstooth-flower!

ania_canvas_web

Then they made us all like, make a canvas about ourselves. Or well, canvas w/pic of ourselves on it. I’m like, whaa…I hate the camera….but hey, look at me – I slapped 8 piccies of me on this one! Haaa! *wink*

Looks pretty easy uh? Well, I’ll tell you – I love these minialphas, they’re superb and perfectly sized for my use – but honestly? All this fiddling with the paint and spray and glitter and stuff and drying stuff? Makes it take oh so long time (sure sure I know – heating gun…well sure, but I’m also lazy – so I just do each word then let them dry while doin other stuff :p Nevertheless. Papers – various Pink Paislee-papers (I whitepainted the background, love the look!).

Some more closeshots:

canvas_cu2_webcanvas_cu3_webcanvas_cu4_webcanvas_cu5_webcanvas_cu1_web

Hmmm that’s it when it comes to my Maya Road stuff this CHA! Had like 4 or maybe 5 days to complete’em all so I’m happy with how these turned out that considered!

~~ Didyaseethat? Maya Road??~~

6a00df3521af148833014e892ea05e970d-800wi


It’s been sorta killing me not being able to share this earlier…haha..

And I’m pretty flabbergasted that Maya Road actually were aware of me…enough to ask me to join their team…I’d never have imagined that in my wildest dreams…tbh I’ve been secretly a bit bummed that they didn’t have official calls, then suddenly out of the blue they asked if I’d like to try out for a position…uhm…yes??? So it’s been a few nervewrecking weeks until everything fell in place & the position was official. Congrats to my fellow MRDT-newbies Angella Peardon and Melissa Sauls!

Right now they have a week-long Design Team Feature, where the designteam-members share their favorite Maya Road-item and you can win a prize package consisting of 5 Maya Mists from the early summer release.


My favorite Maya Road items were too difficult to pick, so I had to go with the generic ANYTHING with chipboards! I love how versatile the raw chipboards can be – you can mist, paint, dress up w/papers, glitterify, whatever – with them. And then I guess I have to admit the birds of a feather set (it’s fairly old, and I’m almost out of it now) are one of the favorites among the chipboard-sets.


card1

Look, isn’t pretty when used with the Doodlebug Sugar Coating Glitter?

The raw chipboardheart is actually a minibook, one where I tore off the pages so I could use them like this.

card2

This kind of card is pretty popular among the cardmakers, and I get why. It’s easy and it does look a little bit fancy…for almost no extra effort compared to “regular” cards. I’m not quite sure what it’s called – easelcard?
card_NEW1

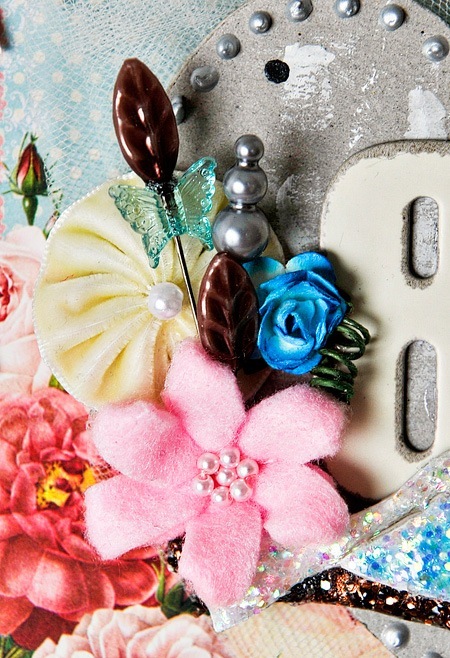
Love the flowers and trinkets too!

card_NEW2

And the chipboard-bird & branch….I love the look glitter+glossy accent together yields…and if you seal the glitter w/glossy accent or some other glossy adhesive, the glitter won’t spread/fall off…big plus….since I wow every time I use glitter it’ll be my last time….love the look, hate the mess!


Maya Road Products: Heart Chipboard Coaster Book, Birds of a Feather Chipboard, Trinket Pins (Vintage Black Pearl, Leaf), Trinket Beads (Hearts, Butterflies), Felt Beaded Blossoms (Light Pink and Dark Pink), Velvet Pleats Blossoms.

Other: Papers from Pink Paislee, tulle, Liquid Pearls, paint, glimmermist, Primaflower.

 
Wedding Dress 2012 | Copyright © 2012: